
 |

|
| ActiveWin: Reviews | Active Network | New Reviews | Old Reviews | Interviews |Mailing List | Forums |
|
|
|
|
|
DirectX |
|
ActiveMac |
|
Downloads |
|
Forums |
|
Interviews |
|
News |
|
MS Games & Hardware |
|
Reviews |
|
Support Center |
|
Windows 2000 |
|
Windows Me |
|
Windows Server 2003 |
|
Windows Vista |
|
Windows XP |
|
|
|
|
|
|
|
News Centers |
|
Windows/Microsoft |
|
DVD |
|
Apple/Mac |
|
Xbox |
|
News Search |
|
|
|
|
|
|
|
ActiveXBox |
|
Xbox News |
|
Box Shots |
|
Inside The Xbox |
|
Released Titles |
|
Announced Titles |
|
Screenshots/Videos |
|
History Of The Xbox |
|
Links |
|
Forum |
|
FAQ |
|
|
|
|
|
|
|
Windows XP |
|
Introduction |
|
System Requirements |
|
Home Features |
|
Pro Features |
|
Upgrade Checklists |
|
History |
|
FAQ |
|
Links |
|
TopTechTips |
|
|
|
|
|
|
|
FAQ's |
|
Windows Vista |
|
Windows 98/98 SE |
|
Windows 2000 |
|
Windows Me |
|
Windows Server 2002 |
|
Windows "Whistler" XP |
|
Windows CE |
|
Internet Explorer 6 |
|
Internet Explorer 5 |
|
Xbox |
|
Xbox 360 |
|
DirectX |
|
DVD's |
|
|
|
|
|
|
|
TopTechTips |
|
Registry Tips |
|
Windows 95/98 |
|
Windows 2000 |
|
Internet Explorer 5 |
|
Program Tips |
|
Easter Eggs |
|
Hardware |
|
DVD |
|
|
|
|
|
|
|
ActiveDVD |
|
DVD News |
|
DVD Forum |
|
Glossary |
|
Tips |
|
Articles |
|
Reviews |
|
News Archive |
|
Links |
|
Drivers |
|
|
|
|
|
|
|
Latest Reviews |
|
Xbox/Games |
|
Fallout 3 |
|
|
|
Applications |
|
Windows Server 2008 R2 |
|
Windows 7 |
|
|
|
Hardware |
|
iPod Touch 32GB |
|
|
|
|
|
|
|
Latest Interviews |
|
Steve Ballmer |
|
Jim Allchin |
|
|
|
|
|
|
|
Site News/Info |
|
About This Site |
|
Affiliates |
|
Contact Us |
|
Default Home Page |
|
Link To Us |
|
Links |
|
News Archive |
|
Site Search |
|
Awards |
|
|
|
|
|
|
|
Credits |

 |
Product:
Marvel G400 TV
Company: Matrox
Website: http://www.matrox.com/mga
Estimated Street Price: $299.00
Review By: Julien JAY
Installation & Setup
|
Table Of Contents |
The Matrox
Marvel G400 TV comes packed with Drivers, S-Video/Audio Cables, Blue external
box, external cable used by the external connectors' box and the card
(Obviously). As usual installing a Matrox board is very easy: simply remove
your old video card and plug the brand new Marvel G400 TV into any AGP
2x/4x or AGP Pro slots. Thanks to the use of the AGP technology the video
transfer rate will be faster than if it used the old PCI technology and
they can now reach a minimum of 528Mbps with AGP 2x. But be aware that
the G400 TV we received is only compatible with AGP 4x but doesn't exploit
its performance which can give you a 1Gbps transfer rate. Compared to
the G400 Max, the Marvel G400 TV has got the same GPU but with a big thermal
dispersing radiator with no fan, contrary to the G400 Max. If you take
a look at the marvel on-board chips, you'll also notice that it uses the
professional high-end Zoran components for full MJPEG hardware compression:
it's proof of high quality.
Once you have installed the board, close your computer and plug the useful
external Marvel connector blue box. This external connector is provided
with a long cable so you'll be able to put it on your desktop to avoid
grabbing behind the computer each time you want to plug a VCR/Audio cable.
The connector box provides Video IN, S-Video in connectors with Audio
In RCA plugs & Video Out, S-Video Out, and Audio RCA Out plugs. The TV
antenna should be plugged on the marvel connector box. Now plug your monitor
cable to the Marvel board and start your computer!
Drivers
Now
you have to install the drivers that are provided on CDs. The drivers
are designed to work under Windows 95/98/98SE/NT 4.0 and drivers are also
available on the net for use with Windows 2000. Once Windows has loaded
Plug & Play kicks in and begins to setup your card, it asks for the drivers
off the of installation CD and after once final reboot you will have to
install the Matrox Video Tools that will enable you to watch TV, or any
incoming video sources to the board. Then you may want to install the
Avid Cinema to edit/mount your favourite video clips. As always with Matrox
the drivers are probably the best ones you can find in any graphical boards.
Settings & Basic Software
Now
that you have all of the drivers and video tools installed, it gives you
a chance to look at some of the new cards settings and software. The first
thing you are likely to notice is the new Icon in your system tray at
the bottom right of your desktop
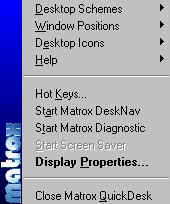
This feature is called the Matrox QuickDesk and it allows you to run diagnostic checks to see if everything is running ok, jump to display properties and try out Matrox DeskNav. You can also save Windows and icon settings. DeskNav - you can use this program to zoom in on your Windows desktop area and to quickly move your view area. To start DeskNav, use the Matrox QuickDesk menu. With the DeskNav desktop preview, you can "navigate" while you're using the Matrox zoom feature or a multi-display desktop. The desktop preview shows you an image of your current desktop, including what's off-screen while zooming. If you're using a multi-display desktop, the DeskNav desktop preview shows a representation of each display in your system.

As you might be able to tell from the image above, you can double-click the preview area to move your mouse pointer to the corresponding location on your desktop. Right-click the preview area for a context menu. While you're using the zoom feature, you can move your view area simply by clicking or dragging on the desktop preview. A rectangle in the desktop preview shows where your current view area is relative to your desktop area. Desktop Properties: Most of you will be familiar with the Desktop Properties tab; the G400 drivers add a few new features for you to get to grips with. If you click on the advanced tag in settings you are greeted with a number of new tabs for you to read through. It makes makes it a little bit easier to find out just how up to date your drivers and bios settings are, it also gives you easy access to memory and serial number information.
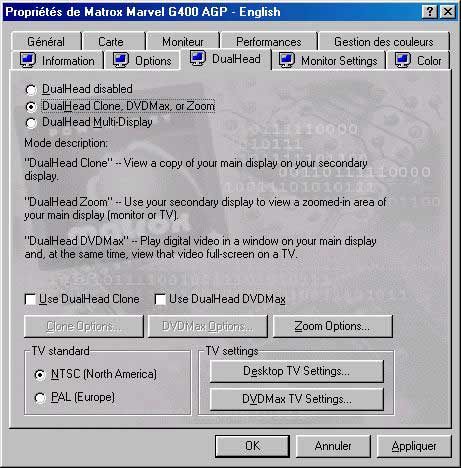
As you can tell from the Image above the DualHead settings are very complete. From the above tab you can select the kind of dualhead mode you want to use and also change the output TV Standard. The most interesting DualHead mode is the 'DVDMax' one that will play any DVD on your computer screen but also on your TV screen to enjoy full-screen mode on your TV without the need of special specific boards. We tested it with a Sony Trinitron TV and it works really great. However if watching films with DualHead on external TV screen is great it's really not the same if you choose to display your Windows desktop on a TV screen. It'll hurt your eyes.
| <-- Introduction | Features --> |