
 |

|
| ActiveWin: Reviews | Active Network | New Reviews | Old Reviews | Interviews |Mailing List | Forums |
|
|
|
|
|
DirectX |
|
ActiveMac |
|
Downloads |
|
Forums |
|
Interviews |
|
News |
|
MS Games & Hardware |
|
Reviews |
|
Support Center |
|
Windows 2000 |
|
Windows Me |
|
Windows Server 2003 |
|
Windows Vista |
|
Windows XP |
|
|
|
|
|
|
|
News Centers |
|
Windows/Microsoft |
|
DVD |
|
Apple/Mac |
|
Xbox |
|
News Search |
|
|
|
|
|
|
|
ActiveXBox |
|
Xbox News |
|
Box Shots |
|
Inside The Xbox |
|
Released Titles |
|
Announced Titles |
|
Screenshots/Videos |
|
History Of The Xbox |
|
Links |
|
Forum |
|
FAQ |
|
|
|
|
|
|
|
Windows XP |
|
Introduction |
|
System Requirements |
|
Home Features |
|
Pro Features |
|
Upgrade Checklists |
|
History |
|
FAQ |
|
Links |
|
TopTechTips |
|
|
|
|
|
|
|
FAQ's |
|
Windows Vista |
|
Windows 98/98 SE |
|
Windows 2000 |
|
Windows Me |
|
Windows Server 2002 |
|
Windows "Whistler" XP |
|
Windows CE |
|
Internet Explorer 6 |
|
Internet Explorer 5 |
|
Xbox |
|
Xbox 360 |
|
DirectX |
|
DVD's |
|
|
|
|
|
|
|
TopTechTips |
|
Registry Tips |
|
Windows 95/98 |
|
Windows 2000 |
|
Internet Explorer 5 |
|
Program Tips |
|
Easter Eggs |
|
Hardware |
|
DVD |
|
|
|
|
|
|
|
ActiveDVD |
|
DVD News |
|
DVD Forum |
|
Glossary |
|
Tips |
|
Articles |
|
Reviews |
|
News Archive |
|
Links |
|
Drivers |
|
|
|
|
|
|
|
Latest Reviews |
|
Xbox/Games |
|
Fallout 3 |
|
|
|
Applications |
|
Windows Server 2008 R2 |
|
Windows 7 |
|
|
|
Hardware |
|
iPod Touch 32GB |
|
|
|
|
|
|
|
Latest Interviews |
|
Steve Ballmer |
|
Jim Allchin |
|
|
|
|
|
|
|
Site News/Info |
|
About This Site |
|
Affiliates |
|
Contact Us |
|
Default Home Page |
|
Link To Us |
|
Links |
|
News Archive |
|
Site Search |
|
Awards |
|
|
|
|
|
|
|
Credits |

Product:
Linux-Mandrake 7.2 PowerPack Deluxe
Company:
MandrakeSoft Inc.
Website: http://www.linux-mandrake.com/en/
Estimated Street Price: free to download (GPL) or
$69.95 for the boxed version
Review By:
Benjamin Wolman &
Julien Jay
First Boot & Configuration
|
Table Of Contents |
The first thing you�ll notice is the boot time: count at least 1 minute 30! However, the boot is done in graphic mode thanks to the Aurora utility and will indicate all the steps of the boot process as well as their status (achieve with success or not). The first bug we�ve noticed is the fact the Num Lock key isn�t automatically enabled and can�t be enabled during the boot using the configuration tools. It�s a bit annoying! After you�ve typed your surname and your password (be careful when you use the root mode since you can easily do stupid things), you�ll arrive on the desktop. Here there�s no surprise: icons are placed on the desktop like under Windows (even the recycle bin is present), the Kde menu (or Gnome is you�ve chosen this graphical user interface during the setup) gives you access to all of your software while a taskbar indicates the actual hour and lets you switch between virtual desktops. That way you pratically won�t see any difference with the Windows world. Finally your companion named Kandalf (remember the film??) is here to help you in case you have problems.
Several configuration utilities are here to help you in your tasks. They�ll give you total control over the system without the need to be a Unix pro! Utilities are grouped in DrakConf, which you can launch from your desktop using the appropriate icon. If you launch DrakConf from the root mode, you�ll directly see a screen giving you access to all the configuration tools. If you�re not in root mode don�t panic, you won�t have to reboot! You�ll simply have to launch DrakConf and type the password of the supreme user.
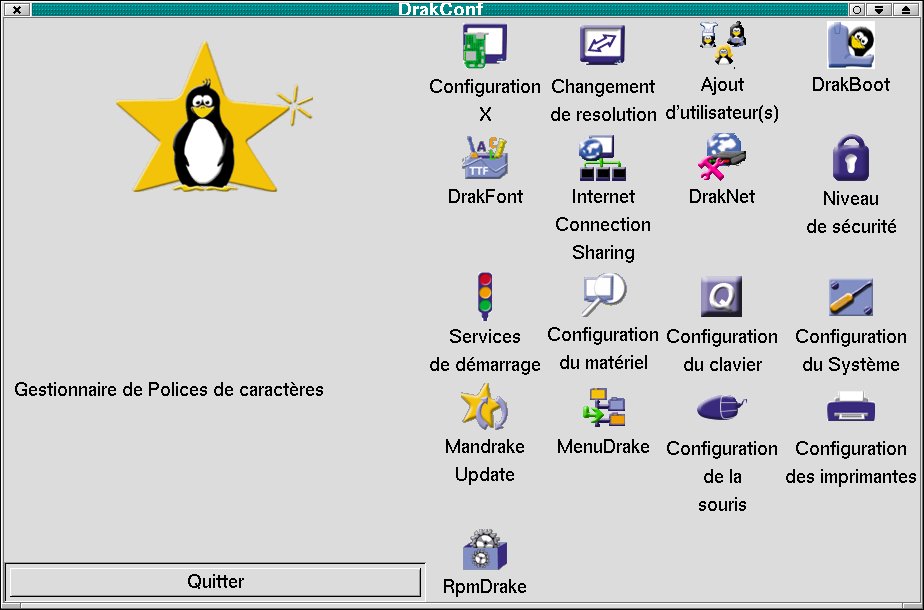
Mandrake
DrakConf
HardDrake is in a way the device manager of Linux Mandrake. It lets you visualize all the installed & recognized hardware on your machine and gives tons of informations about your devices. Now USB, JoyStick or Webcam devices are perfectly recognized, most of the time, which is real progress! Same thing for the graphic cards: most of them work with no problem even the recent GeForce III ones. The second bug we�ve noticed is the fact your mouse wheel isn�t automatically configured.
DiskDrake allows partitioning your hard disk like Partition Magic. The use of DiskDrake is simple and efficient thanks to its clear interface. More over, it manages a wide number of partition format: fat16/fat32, ext2, reiserFS etc. The Cups utility helps you configuring your printer easily. It didn�t generate any problems with my HP LaserJet 1100 printer. Anyway due to its clear & efficient interface and if you know your printer characteristics, installing it won�t be a problem (you can also install your printer during the system setup).
The most impressive utility is surely MandrakeUpdate. Indeed this one updates your system and software with the latest & more recent new releases! And best of all, I can ensure you it works great, better than WindowsUpdate! Its use remains simple: you choose the nearest server (lots are available), you download the available updates list, and then you start downloading and installing the packages of your choice. I was able, that way, to download 350 MB of updates in approximately one hour. After a session�s reboot (no need to relaunch the whole PC), everything was new! The third bug is that if you install updates on a system installed in another language than English you may have dead links in the Kde menu.
Tons of other utilities are available but making an exhaustive listing would be useless: it�s better you discover the system capacities by yourself!
| <-- System Requirements & Setup |