
 |

|
| ActiveWin: Reviews | Active Network | New Reviews | Old Reviews | Interviews |Mailing List | Forums |
|
|
|
|
|
DirectX |
|
ActiveMac |
|
Downloads |
|
Forums |
|
Interviews |
|
News |
|
MS Games & Hardware |
|
Reviews |
|
Support Center |
|
Windows 2000 |
|
Windows Me |
|
Windows Server 2003 |
|
Windows Vista |
|
Windows XP |
|
|
|
|
|
|
|
News Centers |
|
Windows/Microsoft |
|
DVD |
|
Apple/Mac |
|
Xbox |
|
News Search |
|
|
|
|
|
|
|
ActiveXBox |
|
Xbox News |
|
Box Shots |
|
Inside The Xbox |
|
Released Titles |
|
Announced Titles |
|
Screenshots/Videos |
|
History Of The Xbox |
|
Links |
|
Forum |
|
FAQ |
|
|
|
|
|
|
|
Windows XP |
|
Introduction |
|
System Requirements |
|
Home Features |
|
Pro Features |
|
Upgrade Checklists |
|
History |
|
FAQ |
|
Links |
|
TopTechTips |
|
|
|
|
|
|
|
FAQ's |
|
Windows Vista |
|
Windows 98/98 SE |
|
Windows 2000 |
|
Windows Me |
|
Windows Server 2002 |
|
Windows "Whistler" XP |
|
Windows CE |
|
Internet Explorer 6 |
|
Internet Explorer 5 |
|
Xbox |
|
Xbox 360 |
|
DirectX |
|
DVD's |
|
|
|
|
|
|
|
TopTechTips |
|
Registry Tips |
|
Windows 95/98 |
|
Windows 2000 |
|
Internet Explorer 5 |
|
Program Tips |
|
Easter Eggs |
|
Hardware |
|
DVD |
|
|
|
|
|
|
|
ActiveDVD |
|
DVD News |
|
DVD Forum |
|
Glossary |
|
Tips |
|
Articles |
|
Reviews |
|
News Archive |
|
Links |
|
Drivers |
|
|
|
|
|
|
|
Latest Reviews |
|
Xbox/Games |
|
Fallout 3 |
|
|
|
Applications |
|
Windows Server 2008 R2 |
|
Windows 7 |
|
|
|
Hardware |
|
iPod Touch 32GB |
|
|
|
|
|
|
|
Latest Interviews |
|
Steve Ballmer |
|
Jim Allchin |
|
|
|
|
|
|
|
Site News/Info |
|
About This Site |
|
Affiliates |
|
Contact Us |
|
Default Home Page |
|
Link To Us |
|
Links |
|
News Archive |
|
Site Search |
|
Awards |
|
|
|
|
|
|
|
Credits |

|
Product: Exchange 2000 Server/Enterprise Server |
Administrative Interface
|
Table Of Contents |
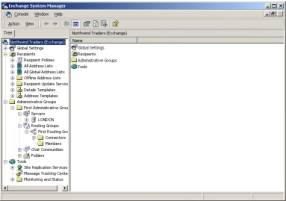
Exchange 2000 has several different places that you can access for Administration. It all really just depends on what you want to do. Think about what you want to do before you get into it. The reason I say this is because you probably won’t remember where everything is that is available to you, but if you can isolate what the option does, then you can find out how to configure it. Anything can be found through various Microsoft Management Console Snap-ins. The above image depicts the Microsoft Exchange program menu. Active Directory Users and Computers is located here because this is where you manage your user’s mailboxes.
In Exchange 5.5, the Exchange Administrator program was used to manage Servers, configure sites, connectors, mailboxes, public folders, etc… User’s Windows security accounts were managed separately though either User Manager for Domains in NT 4 or Active Directory Users and Computers in 2000. Microsoft has apparently shifted the administrative model for Exchange 2000 into two separate sections: User Configuration through Active Directory Users and Computers, and Server Configuration through the Exchange System Manager. So now, if you must configure one user to use a separate mail store, or even enable instant messaging for a user, it’s done through Active Directory Users and Computers.
If you need to set up a second mail store on the Exchange Server, configure a connector, or enable instant messaging, go to the System Manager. Another tool, the Migration Wizard is used to extract users’ mailboxes from a dissimilar mail system to Exchange 2000. This is a wizard-driven application. The Active Directory Cleanup Wizard is used to merge user information between Windows 2000 Accounts or through an imported file.

Before we begin I want to answer one question:
How does Exchange 2000 look inside of Active Directory?
We already know that Exchange 2000 uses Active Directory as its directory service. There is no longer an independent one for Exchange. But what does it look like, and how closely tied into Active Directory is Exchange? To fully answer this, you must first understand where everything is stored inside of AD. Active Directory is a database that is divided into three partitions, or divisions: Domain, Configuration and Schema. The diagram below displays this.

If you really want to see EVERYTHING that is Active Directory, you’ll need to configure a few additional administrative tools. First, you should register a dll that will enable you to view and modify the schema of AD. Open a command prompt and type: regsvr32 schmmgmt.dll. After you do that you are able to look at a new snap-in through the MMC called the Active Directory Schema. Be very careful with this snap-in, as it will affect your ENTIRE ACTIVE DIRECTORY FOREST. Better yet, look, but don’t touch. The second item that you will need to set up is the Windows 2000 Support Tools. This can be found on the Windows 2000 Server CD ROM in the SUPPORT\TOOLS folder. Execute the 2000Rkst.MSI file. After setup of the 2000 Support Tools is complete, you can use another new tool called ADSI Edit.
Open a MMC from the Run Menu and add four Snap-ins:
-
Active Directory Users and Computers
-
Active Directory Sites and Services
-
Active Directory Schema
-
ADSI Edit
After adding the Snap-ins, you will need to configure them. Right-click Active Directory Users and Computers and select View -> Advanced Features. To configure the Sites, right-click AD Sites and Services and select View -> Show Services Node. Finally, you will need to configure ADSI Edit. Right-click ADSI Edit and Select Connect To. In the Connect to dialog box, select Domain NC from the Naming Context pull down menu. Repeat that process to add the Configuration Partition and Schema. Your custom MMC should look something like this:
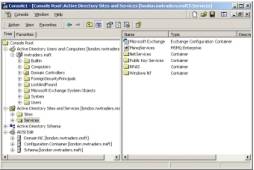
If you expand AD Users and Computers and the DomainNC section of ADSI Edit, you should see some similarities. Also, compare the Configuration Container against Sites and Services, then finally the Active Directory Schema against the Schema Container. You will see that they are exactly the same. Think of ADSI edit as being the Registry Editor for Active Directory. With that thought in mind, ask yourself one question: “Would I modify the registry for any reason?” If the answer is no, then treat ADSI Edit with the same respect because if something is incorrectly modified in the registry of your computer, it can cause the system to crash. Well, if you modify something incorrectly in ADSI Edit, AD can crash, so BE CAREFUL!!!
The Domain partition holds every Object in your domain, like Users, Computers, Groups, OU’s, etc… So, whenever you create a new user account in Active Directory Users and Computers, you are actually modifying this partition. The information stored in here is unique to the domain that you are currently connected to.
The Configuration partition is a little more spread out through your Active Directory Administrative tools. We will only touch on two of the sections of this partition, Sites and Services. As you add Sites, or modify Services, like Exchange, you will see this partition modified. If you add a new server, or Administrative Group, you are affecting this container, and you will see it in AD Sites and Services. When you open the Exchange System Manager, you will see everything pertaining to Exchange in the Services Node. Exchange mostly modifies the information in this container when you run ForestPrep. Open the container and look at the similarities between it, the Services Node in AD Sites and Services, and the Exchange System Manager.
The Schema partition can be seen through Active Directory Schema. This is a list of every possible object that can be created in Active Directory, and the attributes of those objects. I like to think of this as the “Template” partition. The information stored in the Configuration and Schema Partitions are replicated across the entire Active Directory forest.
The System Manager
This is a tool that you can use to completely manage the Server; users aren’t directly affected by this utility. When you open it for the first time, you see a screen like this:
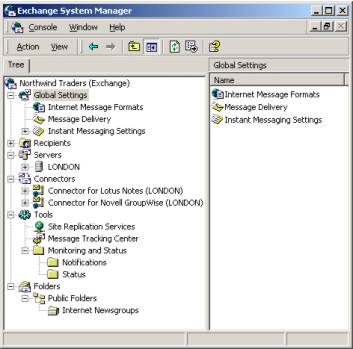
I think that this view looks a little too cluttered, so the first thing that I usually do is selecting the options to view the Administrative and Routing Groups. To do this, right-click your Organization and select properties. Then check the two boxes to display the Administrative and Routing Groups. Your System Manager should now look like this:
The reason why I prefer this view is because most of the time you will be working with the Exchange Servers, Connectors or Mail Stores, so with this view, they are all nested together. So, I guess we’ll start at the top and work our way down the list.
Global Settings - The global settings are ones that affect the entire Exchange organization. They are broken down into three sections: Internet Message Formats, Message Delivery, and Instant Messaging settings.
-
Internet Message Formats -You can configure rules for different SMTP Domains, like allowing Out of Office replies to certain domains. Let’s use Microsoft as an example. They work closely with MSN and may want their people to be able to send Out of Office replies to anyone from msn.com, but not allow Out of Office replies for any other SMTP domains. All they would have to do is create a new domain inside of this container named msn.com and specify the option to Allow Out of Office replies. Keep in mind however that if you modify the “*” domain, you are affecting all domains not specified in this container. Also, if you define a domain, it will not “inherit settings from any other domain.
-
Message Delivery –If you go to the properties of message delivery, you can specify how large of messages can come into, or leave your organization.
-
Instant Messaging Settings –These settings allow you to configure how instant messages are sent out of your organization if you use a firewall or Proxy Server.
Recipients – The Recipients section allows you to configure how recipient email addresses and Address Lists are generated. You can also configure what information people see, when they open users attributes through the Global address list in Outlook. There are seven sections here: Recipient Policies, All Address Lists, All Global Address Lists, Offline Address Lists, Recipient Update Services, Details Templates and Address Templates.
-
Recipient Policies –The recipient policies are policies that you can create to automatically generate email addresses for different types of users. This is cool because if you host mail for different external companies, you can create a policy that says, “For any users with the Company Name field identified as ActiveWin, create an SMTP address user@ActiveWin.com.” You can create policies that are for each separate company that you host. The policies all have priorities. What happens is, when the policies start to update in AD, they each user evaluates policies one-by-one until they find one that matches their criteria. So, be careful. These policies don’t combine on top of each other. The last policy on the list if the default policy, that one will create email addressed with the user@organizationname.com formats.
-
All Address Lists – This container holds all address lists that can be viewed by MAPI clients on your Exchange Network. You can create different criteria for different address lists and Exchange will automatically generate them. For example, lets say you have a New Orleans location and a New York location and you want users to be able to see a list of all users in their respective locations. All you would have to do is create two address lists, one that is generated with all users that have the attribute “Location” identified as “New Orleans” and another with the attribute as “New York.” If you go to the properties of each address list, you can even define which users are allowed to view them on the security tab.
-
All Global Address Lists – This container allows you to create Global Address Lists
-
Offline Address Lists –This container allows you to create Offline Address Lists that mobile Outlook Users would be able to download and search while not connected to the network.
-
Recipient Update Services – These are the services that control when all the recipient objects are updated in Exchange with AD. Each Active Directory domain can be updated on Exchange at different intervals; this is where you configure this option. You can also specify what Server will be used for the updating.
-
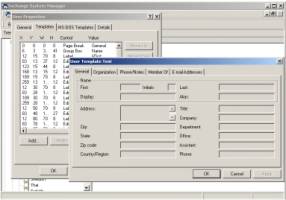
Details Templates – When a user in Outlook opens and Exchange-based address list and wants to see the properties of a mail recipient, this is where you can configure what they can see. If you have extended Active Directory to have an updateable Employee ID field, that information can be viewed through Exchange inside of Outlook by adding the attribute to this template.
-
Address Templates – Exchange also lets you choose how address templates are created when you add additional addresses for a mail user. This is where you configure that.
Administrative Groups
Administrative Groups in Exchange 2000 give you the ability to organize servers into groups for administrative purposes. With these administrative groups, you can create policies that apply to a set if servers in that administrative group. For example, you can create a policy for maximum size limits on mail or public folder stores.
-
Servers – The Servers container logically organizes your servers for simpler administration. Inside of this container, you can create storage groups and stores.
-
Routing Groups – This is where you go to control the flow of mail in your organization.
-
Chat Communities
-
Folders –All public folders in your Exchange organization are kept here for easier administration. You can create multiple public folder trees here.
Tools
Within the tools container, you can track messages, control the flow of Active Directory-to-Exchange 5.5 replication, and even check the status of other Exchange Servers.
-
Site Replication Services – Exchange 5.5 had its own directory service, as I hope you are now aware of. Many companies have invested a lot of time populating their directories with information about their employees, like phone numbers, addresses, etc… So, when you set up Active Directory Connectors, you can monitor them here.
-
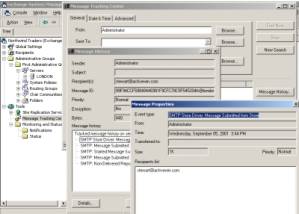
Message Tracking Center – This is my favorite Exchange Tool in this section. The little utility allows you to track a message all the way from its source to the destination. To track a message, simply right-click the Message Tracking Center icon and select Track message. A Window will appear and allow you to specify which user you want to track. There is only one thing you need to be aware of though.
Note: You must turn message tracking on at the Server to track messages!!! Right-Click your Server in the Administrative Group and Select the Enable Message Tracking check box.
Message tracking does not keep a copy of all messages sent through your organization, but it does log the paths that every message, since your enabled it, has taken in and out of your Exchange Organization.
-
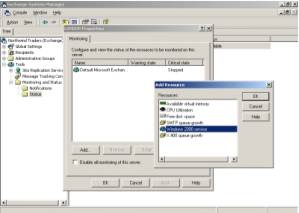
Monitoring and Status – This is another utility that is very useful. Inside of the Notifications container, you can set up mail recipients that will be notified if there are problems with any Exchange Server or mail connector in your organization. The Status container displays a list of all Exchange Servers in your organization and what is being monitored on each individual one. The really cool thing about this feature is that you can monitor not only Exchange Services, but Windows 2000’s services, system performance, etc…
As you can see, Exchange has some very interesting Administrative tools inside of the System Manager. I could go into much more detail, but I think it would take a VERY long time to cover all that. This could also turn into an in-depth tutorial if I went any further, and I can’t quite do that because then none of you would need to come to my company and take an Exchange 2000 class. If you are interested in me teaching you Exchange 2000, or any other Microsoft Server stuff, you can arrange it through my company at www.biermangroup.com. (Cheap plug) Let’s go on to more things in Exchange…
Helpful Knowledge Base Articles
-
Q231731 - XADM: Administrative Groups and Routing Groups
-
Q231733 - XADM: Policies for Administrative Groups
-
Q242561 - XADM: How to Make Administrative Groups/Routing Groups Containers Visible in Exchange System Manager
-
Q254030 - XADM: Cannot Resolve or Open Administrator's Exchange 2000 Mailbox, E-mail Address Is Not Generated by Recipient Update Service
-
Q252395 - XADM: Creating Recipient Policies Based on Administrative Group